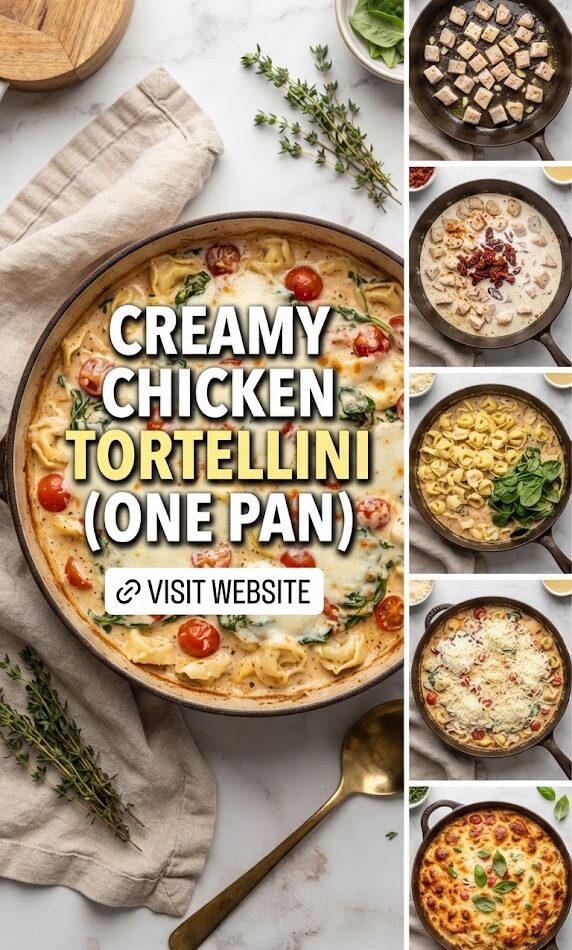
In the fast-paced rhythm of modern life, the kitchen often becomes a battlefield between the desire for a gourmet, home-cooked meal and the exhaustion of a long workday. Enter the Creamy Chicken Tortellini, a one-pan wonder that has captured the hearts of home cooks across the United States. This isn’t just a recipe; it’s a strategic solution to the “what’s for dinner?” dilemma, offering a symphony of textures—from succulent golden chicken to pillowy, cheese-filled pasta—all enveloped in a velvet-smooth sauce.
The beauty of the one-pan method lies in its efficiency. By cooking everything in a single skillet, you aren’t just saving yourself from a mountain of dishes; you are building layers of flavor that a multi-pot process simply cannot replicate. Every drop of juice from the seared chicken and every aromatic note from the garlic and onions becomes the foundation for the sauce, ensuring that every bite of tortellini is infused with concentrated deliciousness.
Why This One-Pan Meal Is a Game Changer
Before we dive into the ingredients and the step-by-step process, it is essential to understand why this dish has become a viral sensation in American kitchens.
- Time Efficiency: In less than 30 minutes, you can move from a cold stove to a steaming plate of pasta.
- Texture Harmony: You get the sear of the chicken, the “al dente” bite of the pasta, and the silkiness of the cream.
- Minimal Cleanup: One skillet means more time relaxing and less time scrubbing the sink.
- Customizability: Whether you want to add more greens, a kick of heat, or different proteins, this recipe serves as a versatile canvas.
The Anatomy of Ingredients: Choosing the Best Components
To achieve a restaurant-quality result at home, the quality of your ingredients matters. Let’s break down the essential components of the Creamy Chicken Tortellini.
1. The Tortellini: Fresh vs. Frozen vs. Dried
For this specific one-pan method, refrigerated (fresh) tortellini is the gold standard.
- Refrigerated: These cook in minutes and have a delicate, pasta-shop texture. They absorb the sauce without becoming mushy.
- Frozen: These are a great backup, but they may require an extra two minutes of simmering.
- Dried: Generally not recommended for one-pan recipes as they take much longer to cook and require significantly more liquid, which can throw off the creaminess of your sauce.
2. The Protein: Chicken Breast or Thighs?
- Chicken Breast: The leanest option. When sliced into thin bite-sized pieces and seared quickly, it remains juicy.
- Chicken Thighs: For those who prefer a richer flavor and more forgiveness in cooking time, boneless, skinless thighs are excellent. They are harder to overcook and stay incredibly tender.
3. The Aromatics: The Flavor Foundation
Don’t skimp on the garlic and shallots (or yellow onions). Sautéing these until they are translucent and fragrant is what builds the “base” of the Italian-inspired flavor profile.
4. The Creamy Element: Heavy Cream vs. Half-and-Half
For the most decadent, glossy sauce, heavy cream is unparalleled. It creates a stable emulsion that won’t break (curdle) when it hits the heat. If you are looking for a lighter version, half-and-half works, but you may need a teaspoon of cornstarch to help it thicken to that iconic “coating the back of a spoon” consistency.
5. The Greens: Spinach and Beyond
Fresh baby spinach is the traditional choice. It wilts in seconds and adds a pop of vibrant color and a boost of Vitamin K and Iron. However, kale or even peas can be substituted depending on your preference.
Step-by-Step Guide: Mastering the One-Pan Technique
Phase 1: The Searing of the Chicken
The first secret to a deep flavor profile is the “fond”—those brown bits that stick to the bottom of the pan after searing meat.
- Season your chicken liberally with salt, pepper, and Italian seasoning.
- Heat olive oil and a pat of butter over medium-high heat.
- Sear the chicken in a single layer. Do not crowd the pan; if the chicken is too crowded, it will steam rather than brown. Remove the chicken once it’s golden (it doesn’t need to be fully cooked through yet).
Phase 2: Building the Sauce
Lower the heat to medium. In the same pan, add your minced garlic and onions. The moisture from the onions will help deglaze the pan, lifting those flavorful brown bits.
- Add a splash of chicken broth or white wine (like Pinot Grigio) to further loosen the fond.
- Pour in the heavy cream and bring to a gentle simmer.
Phase 3: The One-Pan Magic
Now, add the tortellini directly into the simmering sauce. Because the tortellini is refrigerated, it will release a small amount of starch as it cooks, which naturally thickens the sauce. Cover the pan for 3–5 minutes. This creates a steam-chamber effect that cooks the pasta evenly.
Phase 4: The Finishing Touches
Return the chicken to the pan. Fold in a generous handful of freshly grated Parmesan cheese and the baby spinach. The residual heat will wilt the spinach and melt the cheese into a luxurious, cohesive sauce.
Pro Tips for the Perfect Creamy Sauce
Achieving a sauce that is smooth and doesn’t “break” is the hallmark of a great cook. Here are some professional tips:
- Tempering the Cream: If your kitchen is cold, let the cream sit at room temperature for a few minutes before adding it to the hot pan to prevent a temperature shock.
- Freshly Grated Cheese: Avoid the pre-shredded cheese in green cans or plastic pouches. These often contain cellulose (an anti-caking agent) that prevents the cheese from melting smoothly, resulting in a grainy sauce.
- The Pasta Water Hack: If your sauce becomes too thick, keep a little extra chicken broth or a splash of water nearby to thin it out to your desired consistency.
Nutritional Insights: Balancing the Decadence
While “Creamy Chicken Tortellini” is often categorized as comfort food, it offers a balanced macro-profile:
- Protein: High-quality protein from the chicken and the cheese filling in the pasta.
- Carbohydrates: Sustained energy from the pasta.
- Micronutrients: Vitamin A, C, and K from the spinach and garlic.
To make it lighter:
- Replace half of the heavy cream with low-sodium chicken broth.
- Double the amount of spinach or add sautéed mushrooms and bell peppers to increase volume without adding significant calories.
- Use whole-wheat tortellini if available for increased fiber.
Variations to Keep It Interesting
One of the reasons this dish remains a staple in American households is its adaptability. Here are four popular variations:
1. The Tuscan Twist
Add sun-dried tomatoes and a pinch of red pepper flakes. The acidity of the tomatoes cuts through the richness of the cream, while the flakes provide a subtle warmth.
2. The Pesto Power
Stir in two tablespoons of basil pesto at the very end. This transforms the sauce into a vibrant green, herbaceous delight that screams “summer in Italy.”
3. The Mushroom and Thyme Elegance
Sauté sliced cremini or shiitake mushrooms with the chicken. Use fresh thyme instead of Italian seasoning for an earthy, sophisticated flavor profile.
4. The Buffalo Chicken Kick
For a modern American fusion, add a drizzle of buffalo sauce and swap the Parmesan for blue cheese crumbles. It’s a bold take that’s perfect for game days.
The Best Equipment for One-Pan Cooking
Not all pans are created equal when it comes to one-pot meals. To get the best results for your Creamy Chicken Tortellini, consider the following:
- Cast Iron Skillet: Excellent for searing chicken and maintaining even heat, though it requires careful cleaning.
- Stainless Steel Sauté Pan: The professional’s choice. It’s great for creating that “fond” we discussed earlier and is non-reactive to acidic ingredients like lemon or wine.
- Non-Stick Deep Skillet: Perfect for beginners. It ensures the cheese and pasta don’t stick, making cleanup a breeze. Ensure it has high sides to contain the sauce and pasta.
Serving Suggestions: Completing the Meal
While this dish is a complete meal on its own, you can elevate the dining experience with the right pairings.
- Side Salad: A crisp arugula salad with a lemon-vinaigrette provides a necessary acidic contrast to the heavy cream sauce.
- Bread: A warm loaf of crusty sourdough or garlic bread is essential for mopping up every last drop of the sauce.
- Wine Pairing: Look for a high-acid white wine. A Sauvignon Blanc or a dry Chenin Blanc will cleanse the palate between rich bites. If you prefer red, a light Pinot Noir works beautifully.
Storage and Reheating: Making It Last
If you find yourself with leftovers, you’re in luck—this dish often tastes better the next day as the flavors have more time to meld.
- Storage: Keep in an airtight container in the refrigerator for up to 3 days.
- Reheating: This is the tricky part. Cream sauces can “split” (separate into oil and solids) if microwaved at high heat. To reheat, place the pasta in a small skillet over low heat. Add a tablespoon of milk or water and stir gently until heated through. This restores the creamy texture.
- Freezing: It is generally not recommended to freeze cream-based pasta dishes, as the texture of the tortellini can become mushy and the sauce may lose its emulsion upon thawing.
Frequently Asked Questions (FAQ)
Can I use frozen chicken?
Yes, but ensure it is fully thawed and patted dry with paper towels before searing. Excess moisture will prevent the chicken from browning.
Is this recipe gluten-free?
Standard tortellini is made with wheat flour. To make this gluten-free, you must use gluten-free tortellini (available in many specialty grocery stores) and ensure your chicken broth is certified gluten-free.
My sauce is too thin, how do I fix it?
Let it simmer uncovered for a few more minutes. The liquid will evaporate, concentrating the sauce. Alternatively, whisk in more Parmesan cheese, which acts as a natural thickener.
Can I use precooked rotisserie chicken?
Absolutely! This is a great time-saver. Simply skip the chicken searing step and add the shredded rotisserie chicken at the very end to warm it through.
The Recipe: Creamy Chicken Tortellini (One Pan)
Ingredients
- 1 lb Boneless, skinless chicken breasts (cut into 1-inch pieces)
- 20 oz Refrigerated cheese tortellini
- 3 cups Baby spinach
- 3 cloves Garlic (minced)
- 1 small Shallot (finely diced)
- 1.5 cups Heavy cream
- 1/2 cup Chicken broth
- 1/2 cup Shredded Parmesan cheese
- 2 tbsp Olive oil
- 1 tbsp Butter
- 1 tsp Italian seasoning
- 1/2 tsp Smoked paprika
- Salt and black pepper to taste
- Fresh parsley (for garnish)
Instructions
- Prep the Chicken: Season the chicken pieces with salt, pepper, Italian seasoning, and smoked paprika.
- Sear: Heat olive oil and butter in a large skillet over medium-high heat. Add chicken and cook until golden brown on all sides. Remove chicken and set aside.
- Sauté Aromatics: In the same skillet, add the shallot and cook for 2 minutes until soft. Add the garlic and cook for another 30 seconds until fragrant.
- Deglaze and Simmer: Pour in the chicken broth and heavy cream. Use a wooden spoon to scrape the bottom of the pan. Bring to a light simmer.
- Cook Pasta: Add the refrigerated tortellini directly into the skillet. Stir to coat. Cover with a lid and cook for 3–5 minutes (check package directions for exact timing).
- Combine: Remove the lid. The sauce should be thickened. Add the cooked chicken back into the pan.
- Wilt and Melt: Stir in the baby spinach and Parmesan cheese. Continue to stir for 1–2 minutes until the spinach is wilted and the sauce is glossy.
- Serve: Garnish with fresh parsley and extra Parmesan. Serve immediately.
Final Thoughts: The Joy of Simple Cooking
The Creamy Chicken Tortellini is more than just a quick dinner; it’s a testament to the fact that you don’t need a dozen pots and hours of time to create something truly spectacular. It embodies the essence of “comfort,” providing warmth and satisfaction with every forkful.
In a world that is often chaotic, there is a profound peace in the sizzle of a pan and the aroma of garlic and cream wafting through the home. Whether you are cooking for a family of four or preparing a romantic dinner for two, this one-pan masterpiece is guaranteed to become a permanent fixture in your recipe rotation. Enjoy the process, savor the flavors, and most importantly, enjoy the extra time you saved on the dishes!